At TaskBrowse, we always prioritize our customers’ feedback and incorporate their requests and suggestions into the development of our project management software. Continue reading to discover the changes in the May update for TaskBrowse, and don’t hesitate to share your constructive suggestions with us.
Project Board
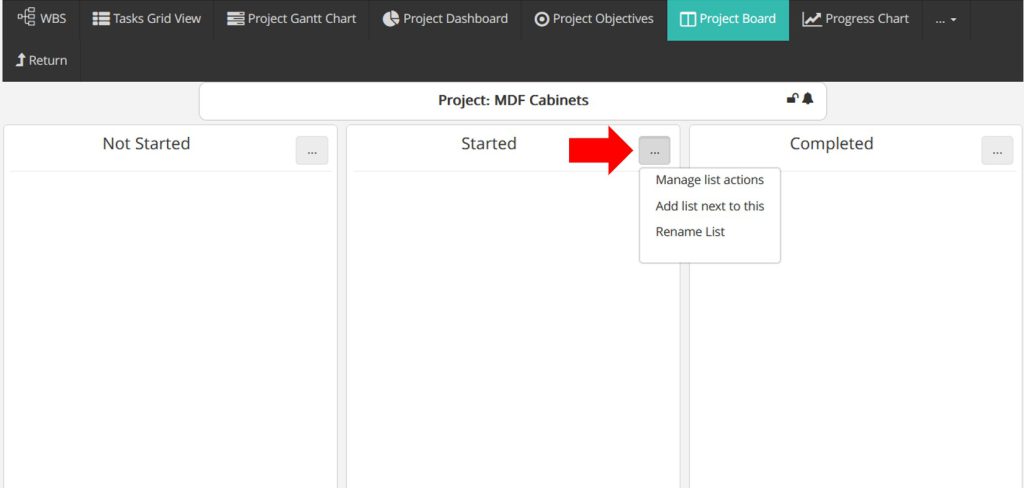
This feature is an exceptional opportunity for customers with projects that have a fixed process and need to check the progress of their tasks during this process. For projects with fixed steps, you can define the work process using the project board. To do this, simply click on the project name and then go to the project board. By default, this section includes three lists: Not Started, Started, and Completed. Add the project tasks to the board as different lists.
For example, suppose your project is cabinet making. In your workshop, the following steps must be done to make any cabinet:
- Design and Planning
- Material Selection
- Cutting
- Connections
- Assembly
- Transportation
You can define these steps on the cabinet-making project board and assign a team to each step. Then, define the construction of each cabinet as a task and monitor its progress.

Add Lists to the Project Board
- You can edit the name of the Not Started stage on the board.
- The name of the Completed step can be edited in the same way.
- Not Started and Completed lists cannot be deleted, nor can teams be added to them.
- The name of the Started step is also editable. Additionally, you can add as many steps as you need between the Not Started and Completed steps.
In this example, the stages of Design and Planning, Material Selection, Cutting, Connections, Assembly, and Transportation were added to TaskBrowse in the form of lists. To add a new list, click on the three dots and then click Add List after the current list.
Assigning Teams to Project Board Lists
When defining project tasks, you assign a team to them. This team is the group responsible for carrying out the tasks. It is also possible to assign a specific team for each phase of the task. Each phase can have its own dedicated team. To do this, click on the three-dot icon on the desired list and select “Manage List actions.”
Managing List Operations:
- If the list is set to manual management (non-automatic), team assignment at each stage and moving between stages is only possible by the project manager or a user with permission to edit project tasks, and the task does not move automatically between stages.
- If the list is set to Assign to new users, you can specify new team members and expect TaskBrowse to automatically assign the task to the new members when it is placed in this list. Once all members of this stage complete the task, it will automatically move to the next stage. Additionally, by enabling the option to send notifications for new assignments, the assignment of the task to new members will be communicated. (In this case, the task will appear as completed for the initial team.)
- If the list is set to Re-assign to initial team, the task will be reassigned to the initial team designated for the task when it is placed in this list. This means the task will be pending for them again. You can also expect TaskBrowse to automatically assign the task to the initial team members and move it to the next stage once all members of this stage complete the task. By enabling the option to send notifications for new assignments, the assignment of the task to new members will be communicated.
- If the list is set to Re-assign to whole team, the task will be reassigned to all members who have worked on this task in all previous stages, including the initial team.
- If a user is a member of the main task team, they can always edit the timesheet and log time on the task. However, if they are not a member of the main team and were added to the task through a list, they will not be able to edit the timesheet if the task moves to a new list that they are not a member of.
Project Panorama
To better visualize the scheduling of the organization’s ongoing projects, the Project Overview feature has been added to TaskBrowse. The Project Overview is a visualization tool that displays project schedules in a Gantt-like chart. This tool makes it easier than ever to track project progress.
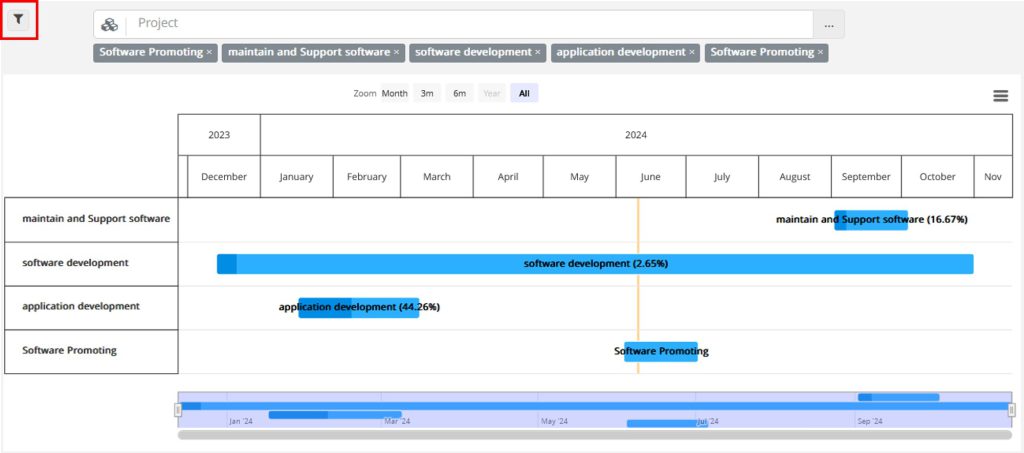
To use the Project Overview, simply click on “Projects” in the TaskBrowse menu and select the “Project Panorama” submenu. In this view, some of the organization’s ongoing projects are displayed by default. Using the filter option, you can choose which projects are shown in the chart.
In the Project Panorama, the percentage of project completion is also displayed. By clicking on the project name in the chart, you are taken to the tabular view of the project’s tasks.
In this view, the start and due dates of the projects are determined based on their sub-tasks. If the tasks do not have start and due dates, their creation dates will be used. However, if start and due dates have been specified for the project itself, these dates will be displayed in the Panorama.
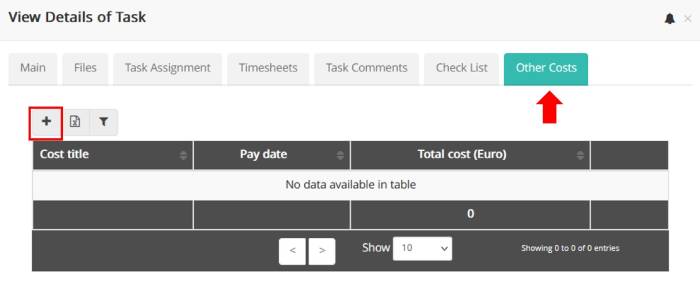
Other costs for Project tasks
Previously, in TaskBrowse, you could only track human resource costs for tasks and projects. However, from now on, you can also add other costs to project tasks, providing a more accurate cost report.
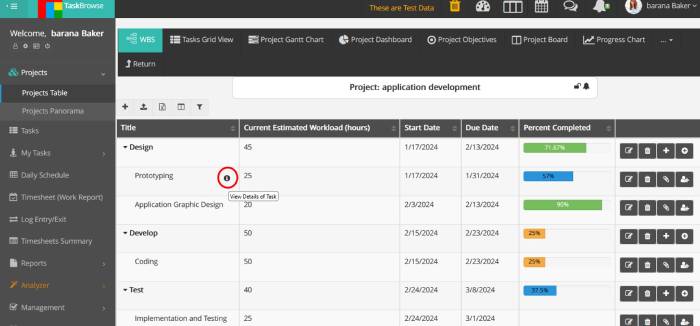
To add other costs to a task, click on the “i” icon and enter the relevant information in the “Other costs” tab.
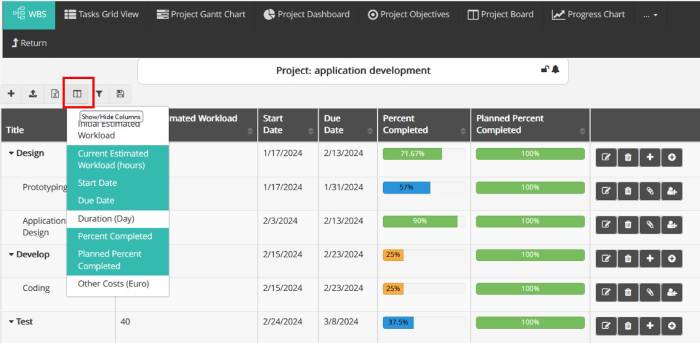
Planned Percent Completed in WBS
Planned Percent Completed is calculated only for tasks with defined start and due dates. It is calculated by dividing the number of days passed since the start date of the task by the total number of days allocated for completing the task.
After this update, the Planned Percent Completed is also displayed on the Work Breakdown Structure (WBS) page. Additionally, this percentage is calculated for summary tasks based on the tasks within them. Please note that the Planned Percent Completed is not among the default columns on this page and must be added if desired using the show/hide columns icon.
Filter on User Group in Analyzer
In TaskBrowse, you can create new reports and charts using the Analyzer feature. One of the parameters available in the Analyzer is the user group. A user group essentially consists of individuals with similar access or permissions. For example, if you have 10 project managers in your team, you don’t need to activate the project manager permission for each one individually. Instead, you can define a user group titled “Project Managers,” activate the project manager permission for that group, and then add those 10 project managers to this group.
Let’s say you need to know the salary of project managers in the organization’s projects to prepare a report. Simply select the parameters of user group, user, project, and wage cost in the report builder of the Analyzer section, and create the report. After selecting the report title, you need to save it. In the recent update, you can also select the user group as one of the available parameters in the filter.
Lock the project
With the help of this new feature, admins and project managers have the power to increase the security of projects and prevent unauthorized changes to the project and its tasks.
Ensure the integrity and stability of your projects by restricting access to critical project details. To lock the project, if you have the necessary access, simply click on the project title and then on the lock icon (as shown in the picture below).
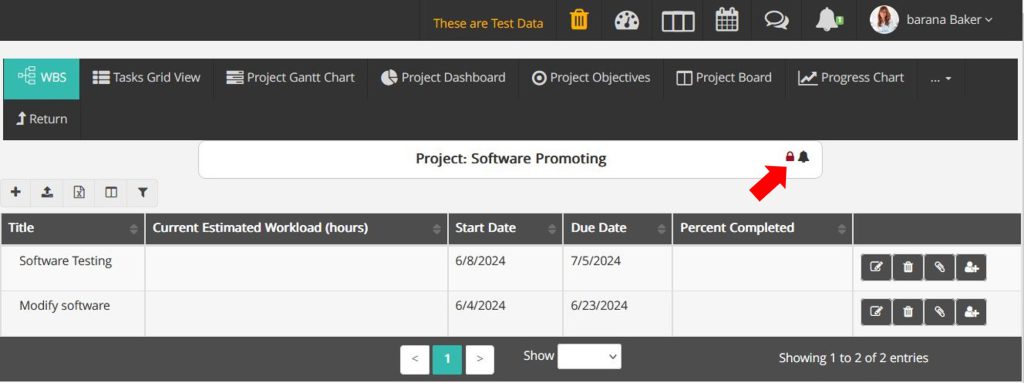
A system admin, a person with access to manage all projects, a project manager, and a member with access to edit all tasks can lock a project. A person with lower access does not have the ability to unlock a project that has been locked by someone with higher access. If you move your mouse over the lock, the user who locked the project will be displayed as a tooltip.
Features of a Locked Project:
- The project cannot be edited or deleted.
- New tasks cannot be defined for the project, and existing tasks cannot be edited or deleted.
- New summary tasks cannot be defined for the project, and existing summary tasks cannot be edited or deleted.
- Changes to the project board cannot be made.
- Attached files to the project and its tasks cannot be deleted (adding new files is allowed).
- New objectives cannot be defined for the project, and existing objectives cannot be edited or deleted (Editing the Percent Realized of existing objectives is allowed).
- The names of files attached to the project and its tasks cannot be changed.
- The project’s featured image cannot be changed.