How Can We Help?
Define Tasks
Achieving a company’s goals requires a set of tasks. This step involves defining the required tasks. If a user has this access, she can see the “tasks” section on the menu. by using this access, the user can define or remove a task, determine the estimated workload and due date of the task, and the users who must perform that. If the user has access to the definition of the project and the task category, defining new items is possible through this menu.
Creating New Task
Main
Title
The task title is a mandatory row in the task definition.
Project title
You can choose from the projects in the organization by clicking on the three dots in front of this row, so that the task is a subset of this project. If you have access, you can also define a new project from this section. This row is not mandatory.
You can put the project tasks into different task categories.
Tips for Choosing a Task Category for a Task
- Each task can belong to only one task category.
- When selecting a task category, you can choose either a category related to the task’s project or a category that is not assigned to any specific project.
- Project-specific categories are defined through the Projects menu.
- To define a general task category (without linking it to a specific project), use the Basic Definitions menu.
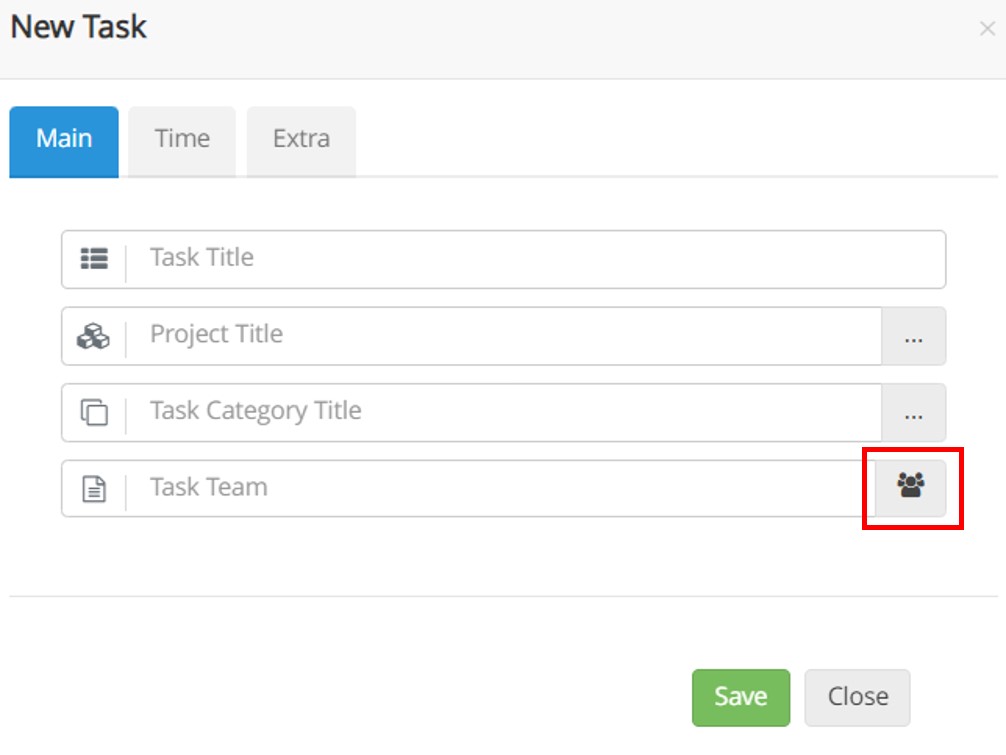
Task Team
To select the task team, click on the option shown in the figure.
skill-based task assignments.
In large organizations with a lot of people, assigning new tasks to people may be time-consuming for managers. Many people with different skills are working in the team. Such problems made TaskBrowse add skill-based task assignments.
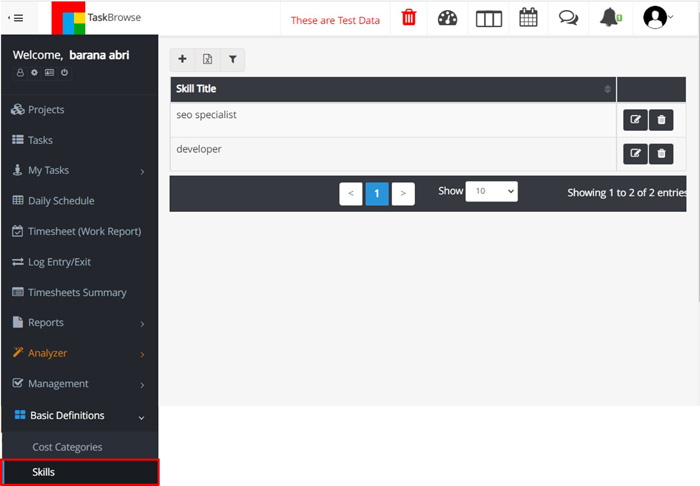
To assign tasks based on skills, you must first define the skills required to perform tasks in your organization. These skills vary depending on your business. For the definition of skills, refer to the basic definitions.
For example, in a software production company, programming is one of the skills.
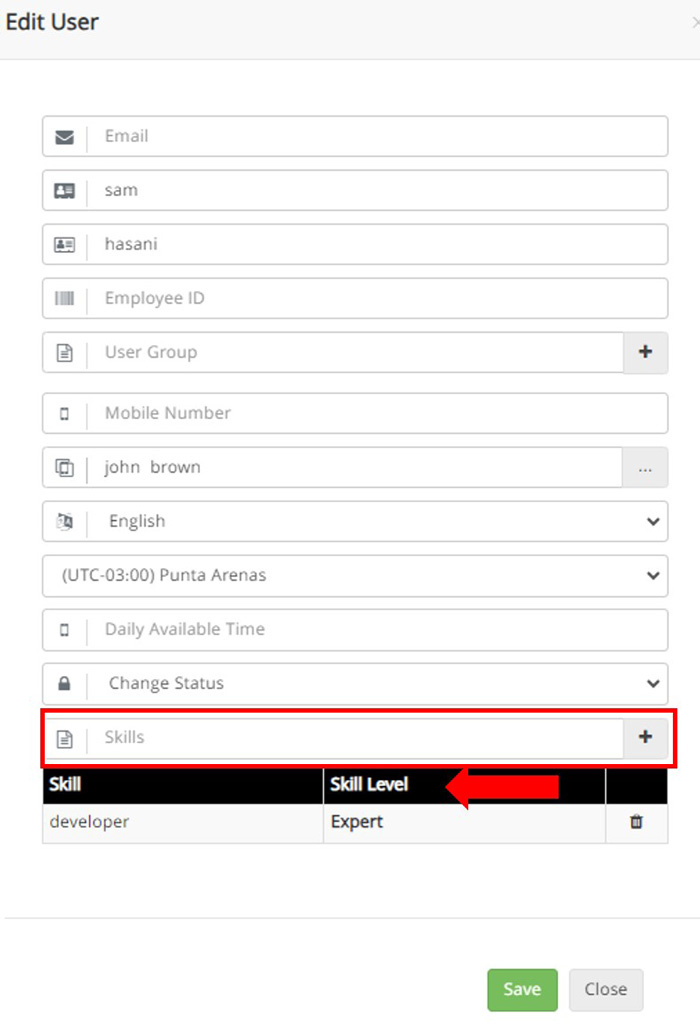
After defining the necessary skills in the organization, it is time to assign them to the users. For this purpose, refer to manage users and user editing and specify the person’s skills in the skills section. You can even determine the skill level of the person. Note that it is possible to define a new skill. Type the skill’s title in the skills section.
In the next step, when defining the task, you must determine the skills required by this task and the level of each skill. TaskBrowse will list the people whose skills are more compatible with this task so that you can create the most optimal team.
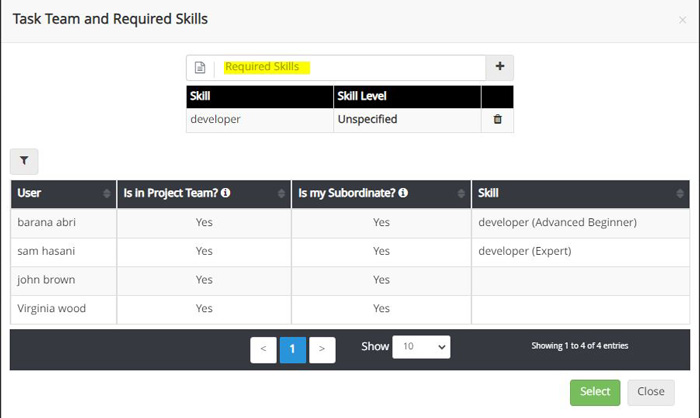
In this section, the free time of users is also displayed to avoid imposing an additional workload on people.
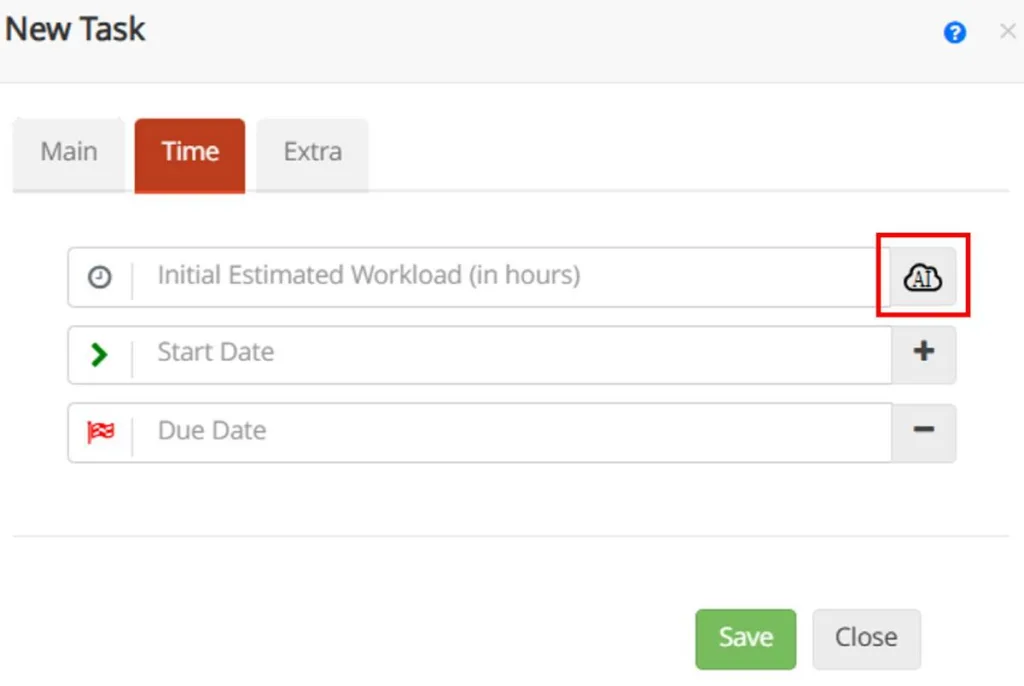
Time
In the “Time” tab, you can determine the Estimated Workload, Start date, and Due date of the task. To determine these, Taskbrowse provides the “Project Progress Report” and shows The Start and due date on the calendar.
AI-Powered Task Workload Estimation
One of the biggest challenges in project management has always been accurately estimating task workloads. This factor plays a critical role in project planning and scheduling, as well as in resource allocation and cost calculation.
In TaskBrowse, when defining tasks in the “Time” tab, you can enter the estimated workload (in hours) for each task. This value is used as follows:
- As the weight of the task in calculating actual vs. planned progress percentages.
- As the basis for calculating user capacity (free time) when assigning tasks.
- As the foundation for estimated costs, the cost is directly tied to the estimated workload.
However, for many of our customers, making accurate workload estimates was a challenge. That’s why we’ve introduced a new feature: AI-powered task workload estimation in TaskBrowse.
How It Works
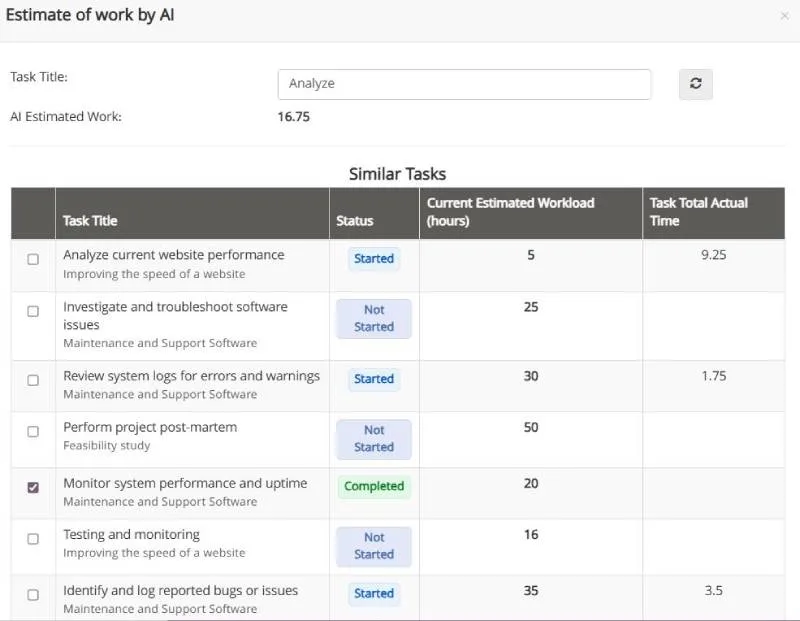
- When creating a task, simply click the AI icon next to the estimated workload field.
- TaskBrowse analyzes your past project records, finds similar tasks, and predicts the required workload with high accuracy.
- Based on the task title, a list of similar tasks is displayed. Completed tasks are automatically selected, but you can manually tick those that are more relevant. (Tasks without estimated workloads will not appear in the list.)
- If a completed task has an actual recorded time, that value will be used. If not, its estimated workload will be considered.
- If a task is incomplete, its estimated workload will be used in calculations.
When the users log in, they will be notified of the added tasks.
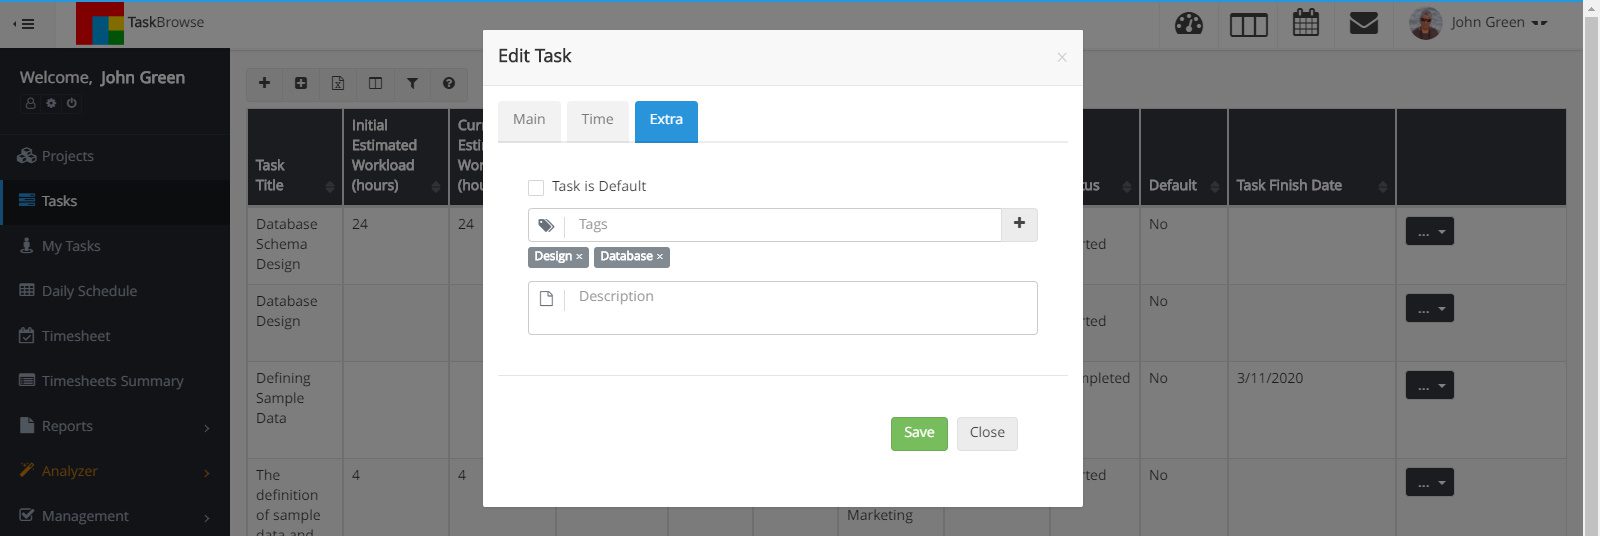
By using the tags field, you can see their information in the data charts separately. To add a new tag, type your desired title in the relevant field, or click on the + button to choose among the existing tags. Edit and deleting the tags can be done in the Basic definitions.
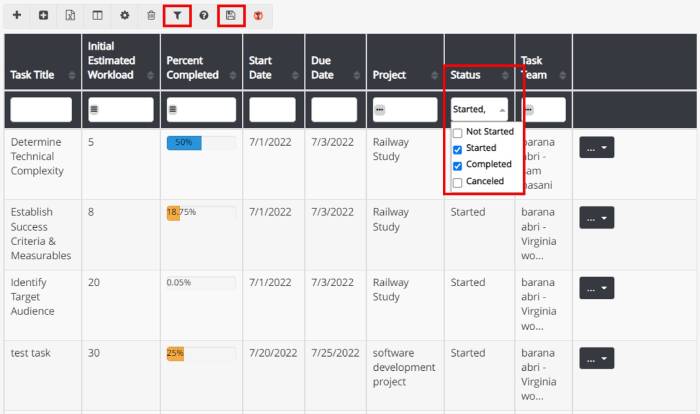
on the top part of the tasks list, you will see the below icons:

Use this button to define a new task.

By using this button, you can assign a task to yourself.

By using this button, you can receive Excel output from the list of tasks and their status.

By using this button, you can select the columns which show different information about the tasks.

This button allows you to filter the tasks based on their features.

It enables a guided tour and shows it to you.

This button allows you to add custom fields.
Custom Field
By clicking on the gear icon and selecting “Custom Field,” you can add your desired field to the tasks table. You can add up to 10 custom fields of any type—number, text, or date—to the table. TaskBrowse also allows you to add a combo custom field. To add a combo field, choose a text field, then enable the combo option and start defining items for the combo field.
Icons
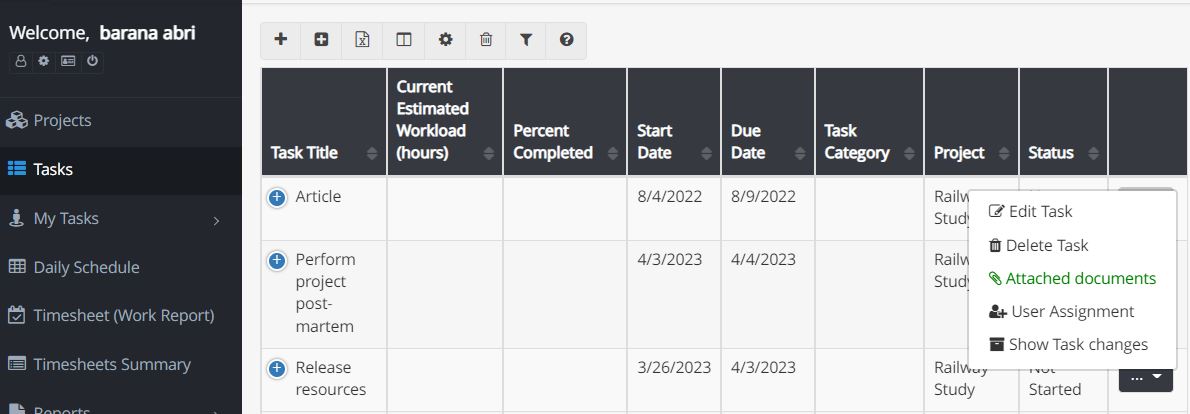
On the right side of every task, there are other buttons. By selecting the dropdown button, you can use them for


There is a button for showing task changes:
What operation happened on what date, and who did that operation?
It is good to know that you can add custom columns using the gear above the table and arrange them by drag and drop. You can save this arrangement.
Task Owner
When you define a task, you are the manager of that task, and as the manager of a task, even if you are not in the team of that task, you will be able to view and edit that task.
You can select multiple statuses to filter tasks.
Don’t forget that you can save your applied filters by clicking on the SAVE icon.
Edit task
In this section, you can edit the details of each task. In addition, the status of each task can be changed to one of the states of not started, started, completed, and canceled. When you change the task status to completed, the finish date field is added for editing.
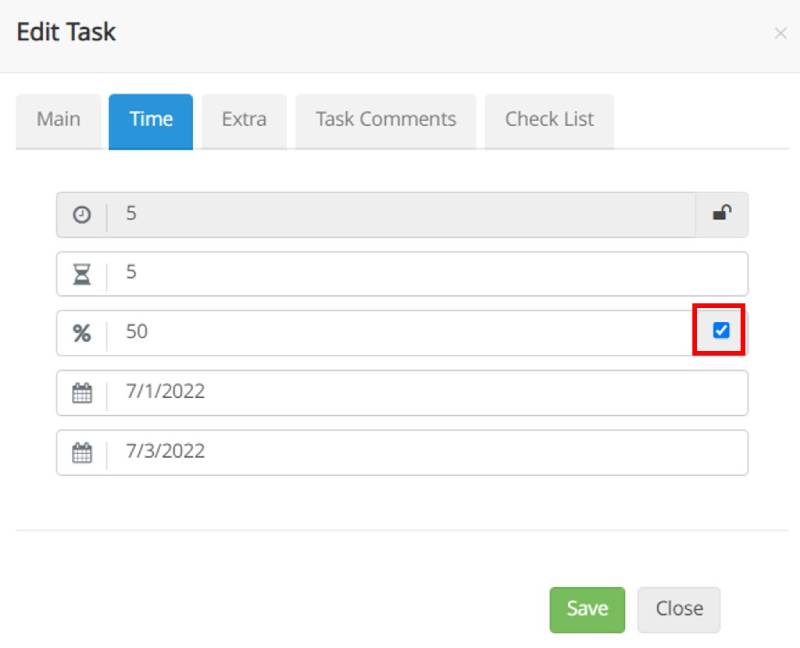
In the time tab, you can enter the percent completed manually, and with this, the system will not automatically calculate the percentage of task progress.
Recurring Task
After creating a task, click on edit, and in the extra tab, tick the Recurring Task. Click on the gear icon to recurring settings.
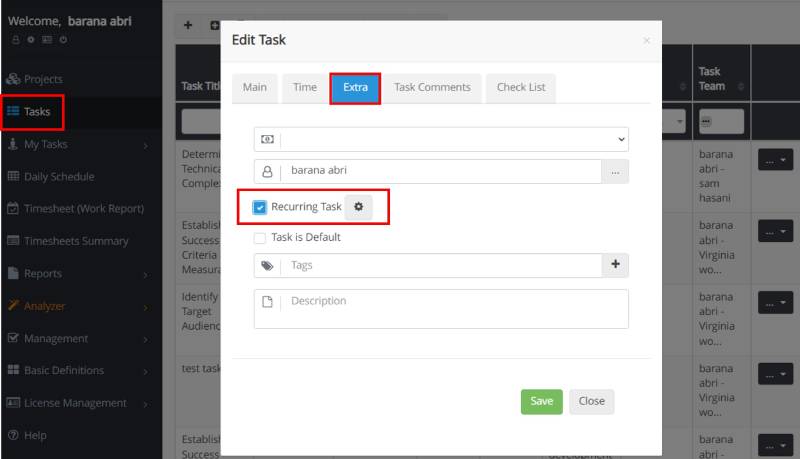
When you specify the task period, the task will be added to the schedule of the team members at the determined time, and therefore it will be displayed in the individual’s work calendar. This possibility is the best solution to avoid forgetting repetitive tasks. Suppose you have a meeting every week at a specific time, and the team members must gather for an hour and talk to each other. Feel free to add this meeting to TaskBrowse as a recurring task so that, for example, every week at 8 o’clock, it will be put in people’s daily schedules and calendars.
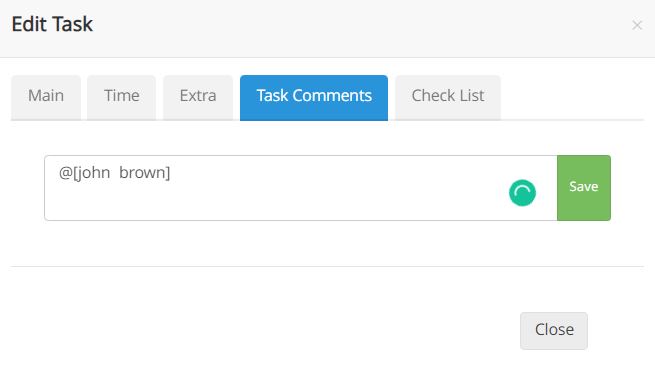
Comments
In the comments tab, you can express your opinion about the task to the people who cooperate with you in doing that task. You can mention people in the comments.
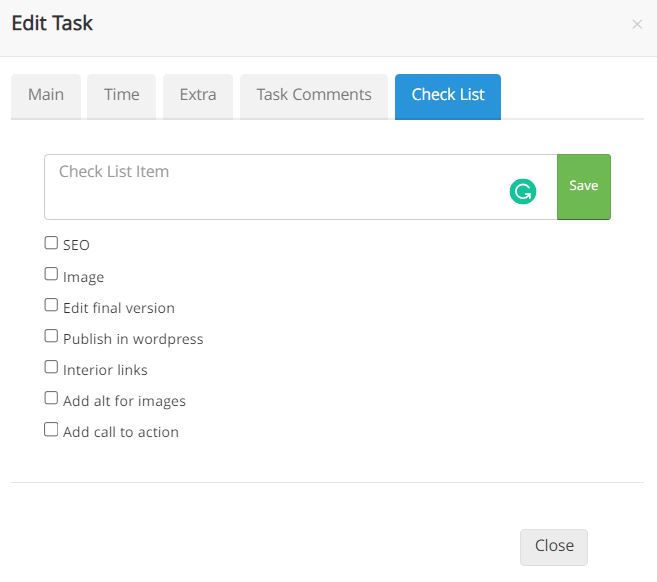
Checklist
In the edit task and checklist tab, add the steps of performing a task. For example, I might define writing articles for a blog as a task. This task includes a checklist that helps me I don’t miss any steps when writing or publishing an article.
Cost category of tasks
This feature helps you to track the human resources costs. First, you should determine user costs in this path: management– manage users and the last column.
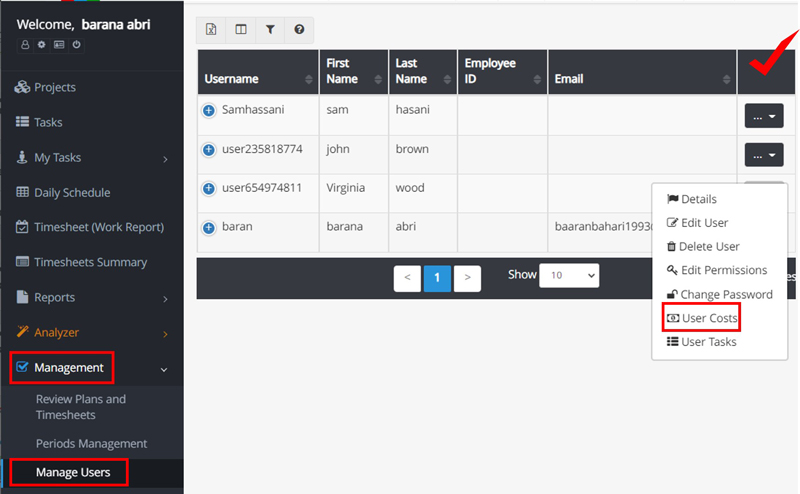
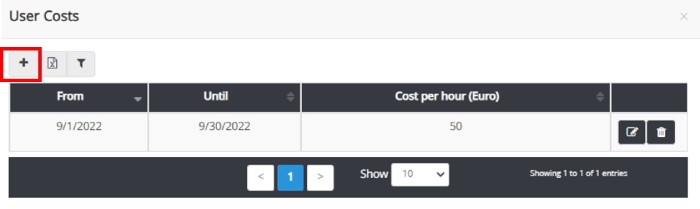
Then, by clicking on the + icon, enter the hourly rate for each person for a specific time. You can change the currency in settings.
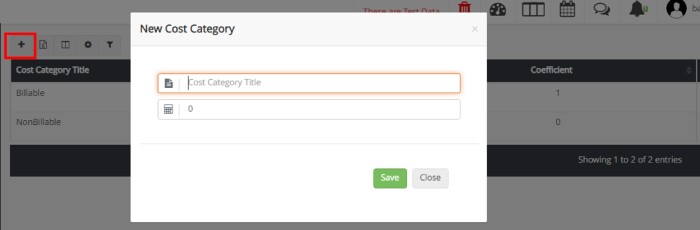
You can define a new cost with the desired coefficient in the basic definitions and cost categories section. Just click on the + icon.
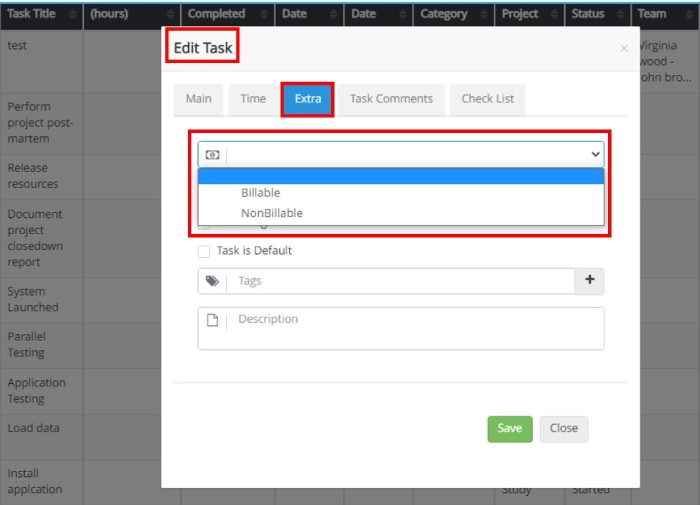
After this, you should specify the cost categories of projects and tasks. For this purpose, go to the Edit section and Extra tab of each project or task.
Attached documents
Sometimes, to perform some tasks, it is necessary to attach the required files. For this purpose, add the desired file after clicking on the “Attached documents” section. After adding a file to a task, the attachment icon will turn green. The manage Files section has been added to the management menu to manage these files.
If you attach an image to the task, you can select it as the featured image to identify the task. The featured image is displayed in the task table.
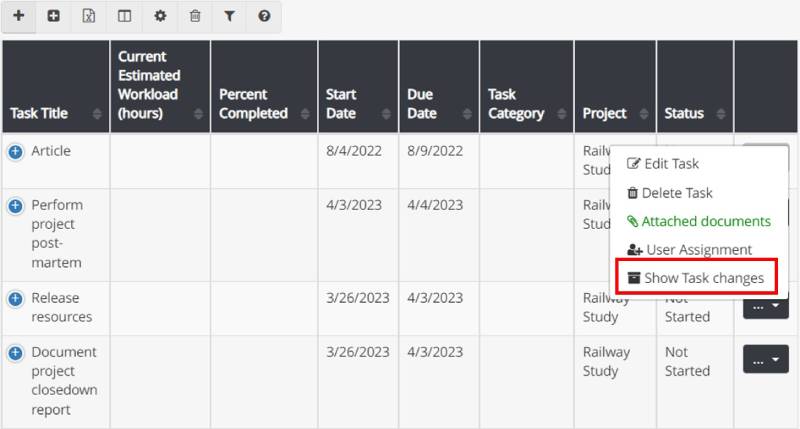
Task changes
Tasks changes can be seen in TaskBrowse. To view the changes of a task, if you have the necessary permission, go to the tasks menu and select the option to show Task changes from the last column of each task.
Percent Completed
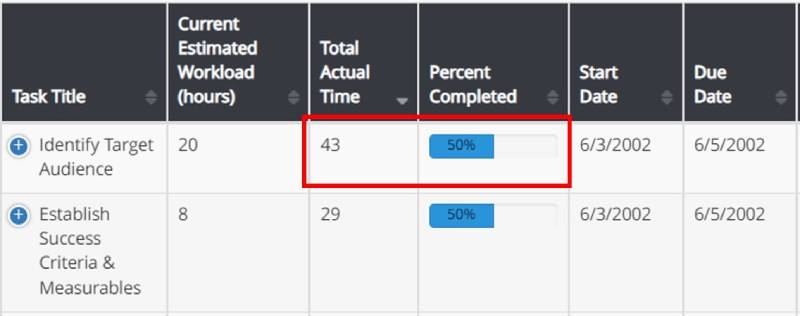
To take advantage of this feature, you should specify an initial time estimate for the tasks. The weight of a task in a project is the initial estimated time of that task. The system automatically considers it for the current estimated time. After registering the timesheets for different tasks, you can see the time in the actual time column. By dividing the Actual time by the Current Estimated Workload, the Percent Completes of the task will be calculated.
Planned Percent Completed
Planned Percent Completed is not in the system default columns. To view that, you need to use the show/hide columns button, which is available at the top of the tasks menu.
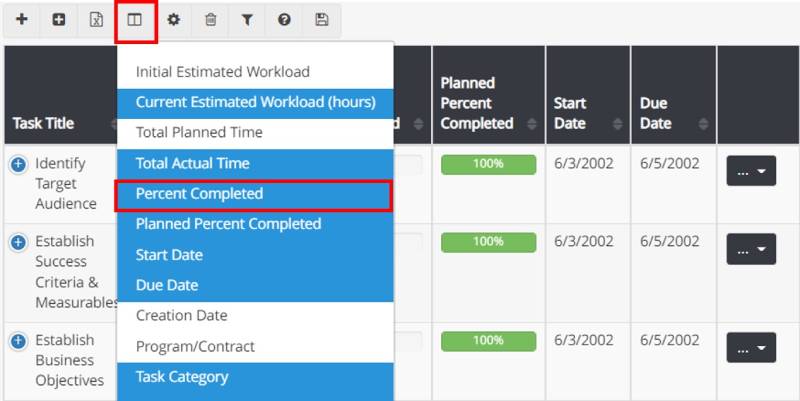
Planned Percent Completed is calculated only for tasks with the start date and due date. Dividing the number of past days from the start date by the total number of days to complete a task, gives us the Planned Percent Completed.